# Diaflow Tables

<figure><img src="/files/kjU7Dar5QhLgAFGXphfV" alt=""><figcaption></figcaption></figure>

The Tables section allows you to create and manage database tables that can be used across all your workflows. The screen below shows the interface for managing your tables.

<figure><img src="/files/BkVGZogZWIItiCzaTWa0" alt=""><figcaption></figcaption></figure>

**Table List**

<figure><img src="/files/OY2GyJtbXh0jCYEt41qS" alt=""><figcaption></figcaption></figure>

**Table Detai:**

<figure><img src="/files/LRjtOswzbldG99Pu4yeV" alt=""><figcaption></figcaption></figure>

## 1. Create a Table

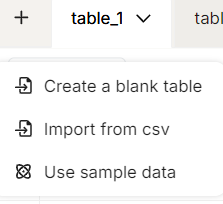
When you click on "**+**" you can create a table by differents ways.

* Create a blank table
* Import from CSV
* Use sample data

<figure><img src="/files/fXJJKdAXOUc4Un6nl5Bo" alt=""><figcaption></figcaption></figure>

The screen below appears when you click the arrow to the right of your table name. It provides options to create a table using a CSV file, add a row, and export tables as CSV files. Additionally, you can rename, duplicate, or delete your table.

<figure><img src="/files/9J7VuHFa5cQn1l1ZA0WI" alt=""><figcaption></figcaption></figure>

## 2. Filter data

You can filter your table by enter a field name and choose an operator (Equal to, Not equal to, Contains).

<figure><img src="/files/6nvoS8SF6Qcv6IYVJtGA" alt=""><figcaption></figcaption></figure>

## 3. Sort data

You can sort your table by entering a field name and choosing ascending or descending.

<figure><img src="/files/smAXv951JQ0GXQRUMwsQ" alt=""><figcaption></figcaption></figure>

## 4. Show data

This tool allows you to hide or show fields to have a better view on your table.                                                                        &#x20;

<figure><img src="/files/EbhxiaqgAfjJbV7iBPqU" alt=""><figcaption></figcaption></figure>

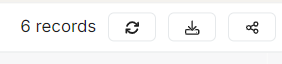
These elements show differents things. First of all "6 records" mean that the table contains 6 rows. When you click on the first icon it refresh the table. The second icon can download the table in a CSV file.&#x20;

<figure><img src="/files/fkC91Fqc8OsnfqGawssR" alt=""><figcaption></figcaption></figure>

## 5. Share table to other members on Workspace&#x20;

When you click on the share icon it appears the screen down below. You can share the table via email.

<figure><img src="/files/h3fZSxqgKIweHV0BTCHs" alt=""><figcaption></figcaption></figure>

## 6. Create a column on the table

Can create a column on the table by click button **+**&#x20;

<figure><img src="/files/KOmpixqLNJTuW838BCWx" alt=""><figcaption></figcaption></figure>

Need input field:

* **Field name**: Input the field name, The column name must not duplicate an existing one in the table.
* **Field type**: Choose one of the options:
  * Single line text
  * Long text
  * Checkbox
  * Multiple select
  * Single select
  * Date
  * Duration
  * Number
  * Currency
  * Rating
  * Created time
  * Last modified time
* **Is required**&#x20;

<figure><img src="/files/CSjUxdtKvdiHurT0obQu" alt=""><figcaption></figcaption></figure>

<figure><img src="/files/4TyI8wv8XBsRaAE1EmOz" alt=""><figcaption></figcaption></figure>

<figure><img src="/files/38tY9hM3pEdzlqyyLlHR" alt=""><figcaption></figcaption></figure>

## 7. Add a row on the table

Can add row on the table by click button **+ Add row**&#x20;

<figure><img src="/files/DNfeJrC2MsfbMinV4j6a" alt=""><figcaption></figcaption></figure>

<figure><img src="/files/HKIlUPvbbksIVii4k3YM" alt=""><figcaption></figcaption></figure>

## 8. Delete/bulk delete row on the table

Can delete or bulk delete rows on the table

**Step 1:** Check the rows you want to delete&#x20;

<figure><img src="/files/RbmRQmq5osjvbAiDcntC" alt=""><figcaption></figcaption></figure>

**Step 2:** Click button "<mark style="color:red;">Delete</mark>" at "**Action options**"

<figure><img src="/files/Nxs1gtgg2MEuGvDPWP79" alt=""><figcaption></figcaption></figure>

## 9. Diaflow Tables Assistant

You can directly retrieve information from the table you are pointing to by chatting with the Diaflow Tables Assistant.

<figure><img src="/files/8HbHT30gTJy1xdGvkXni" alt=""><figcaption></figcaption></figure>

<figure><img src="/files/e4kaOWIp6nTY0uS80as9" alt=""><figcaption></figcaption></figure>


---

# Agent Instructions: Querying This Documentation

If you need additional information that is not directly available in this page, you can query the documentation dynamically by asking a question.

Perform an HTTP GET request on the current page URL with the `ask` query parameter:

```
GET https://docs.diaflow.io/productivity-tools/diaflow-tables.md?ask=<question>
```

The question should be specific, self-contained, and written in natural language.
The response will contain a direct answer to the question and relevant excerpts and sources from the documentation.

Use this mechanism when the answer is not explicitly present in the current page, you need clarification or additional context, or you want to retrieve related documentation sections.